DM系列存储OEM netapp 的FAS系列,而netapp 的FAS系列采用的ONTAP包括来自Berkeley Net/2 BSD Unix,Spinnaker Networks技术和其他操作系统的代码。要玩转ontap,得掌握相关的命令,目前在浏览器GUI中的配置功能,已经完全可以满足大部分客户对存储的需求,除个别配置外。
Linux下交互式多路径自动化配置脚本发布
本章内容以配置FC-SAN为主,如果要配置其他功能,点击下面的连接即可
(一),NFS
(二),SMB/CIFS
(三),ISCSI
(四),快照及克隆
一,前期准备及注意事项
(1)FC(含FCoE)不支持直连,必须有SAN交换机,iSCSI可以直连
(2)聚合成员盘必须在同一个控制器,即node1的所属硬盘只能在一个聚合里,node2的所属硬盘在另一个聚合,如果盘的数量较少,可以将硬盘全部归属到某一个控制器,提高磁盘利用率
(3)每个控制器的0c和0d是同一芯片,0e和0f是同一芯片,如果需要做静态绑定或者LACP绑定,则0c和0e一组,0d和0f一组
二, 存储初始化
1,硬件安装
线缆连接,要点如下:
(1) Switchless cluster随机带两根0.5米DAC线,连接两个节点e0a <-> e0a, e0b <-> e0b (下图中绿色线);
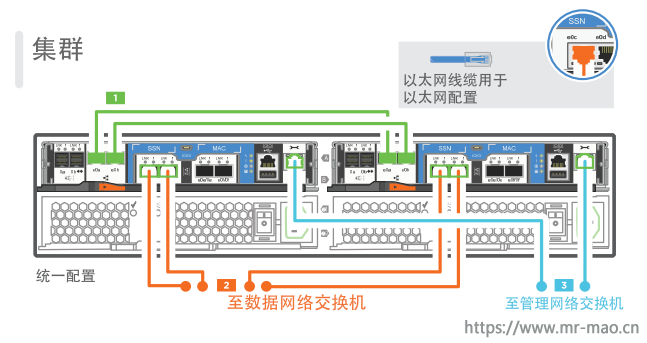
(2) 无扩展柜随机带两根0.5米SAS线,需要将两节点SAS口交叉连接,0a <-> 0b, 0b <-> 0a(下图中黄色线,注意交叉)

(3) 有扩展柜的情形根据扩展柜和SAS口的数量连接,下面以DM5000H为例,只有一个stack,更多SAS口可以设置更多stack;
扩展柜连接原则是,
a) 高可用,每块磁盘连接至不同node;
b) 一致性,从不同node看到的磁盘ID(stack.shelf.bay)相同
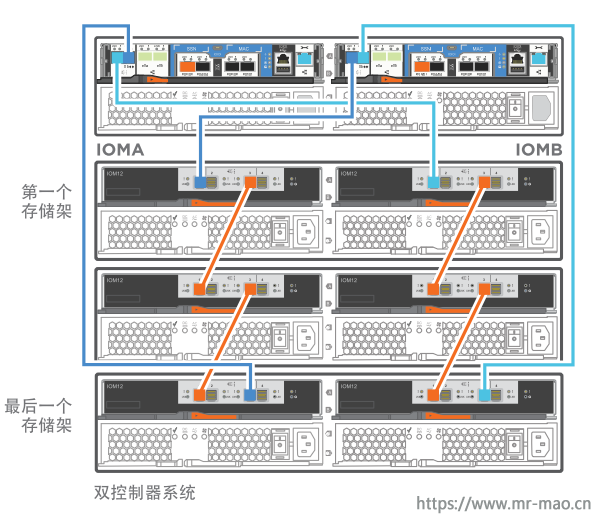
如果有扩展柜,需要设置磁盘柜序号,长按前面板按钮,设置磁盘柜序号,如果多个磁盘柜号码相同,系统在显示磁盘时,磁盘柜部分将以序列号显示。
2,集群初始配置
使用存储包装箱自带的micro USB连接线,连接笔记本电脑和存储的节点,确保驱动安装正常,我测试了智能手机的数据线也可以正常使用
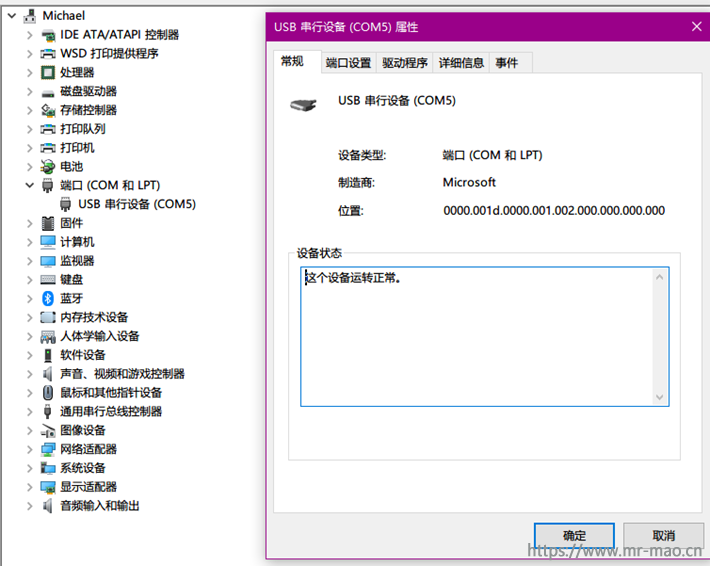
波特率及数据位、停止位参数如下:
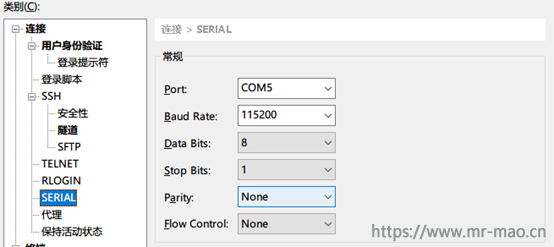
3,扩展柜SAS连线检查,如果没有扩展柜,则不需要此步
使用micro USB逐个连入节点,用户admin,使用halt命令分别在两个节点停止系统。
*> halt -node localhost

在loader中选择进入maintenance mode
LOADER-A> boot_ontp maintenance
启动过程中看系统提示,如果另一个节点没有停止,系统会警告不要做更改,接受并进入maintenance mode
在maintenance mode内查看磁盘柜连接和磁盘情况,主要目的是确认磁盘状态正常,SAS线连接正确。
检查磁盘状态,下面显示DD为空,检查是否所有已安装磁盘都可见,如下图,我配置的这套存储有控制器和扩展柜,控制器满配24块硬盘,扩展柜加了6块硬盘
*> sasadmin shelf
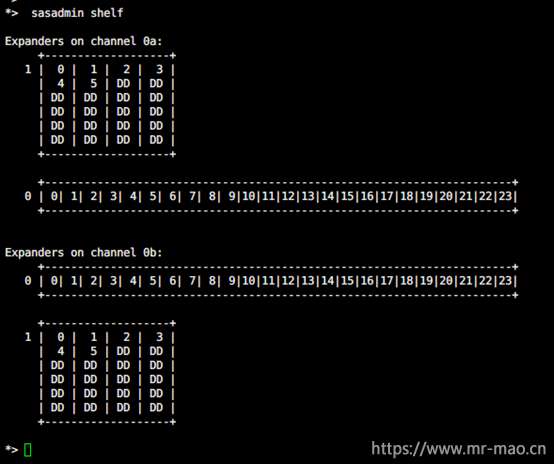
在一个节点看到的磁盘连接,每块盘应当分别连接A,B端口。
*> storage show disk -p
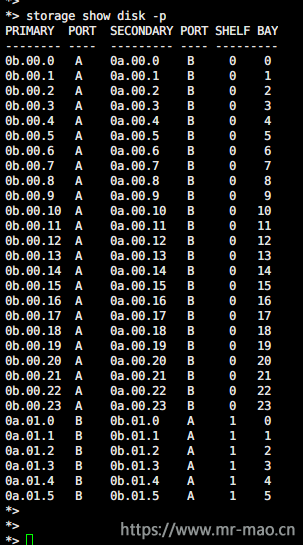
在另一个节点看到的磁盘连接,每块盘也应当分别连接A,B端口。
退出maintenance mode,
*> halt
LOADER-A> boot_ontap
4,在一个节点创建集群
首次开机将进入配置向导提示输入yes,如果没有,可执行
cluster setup
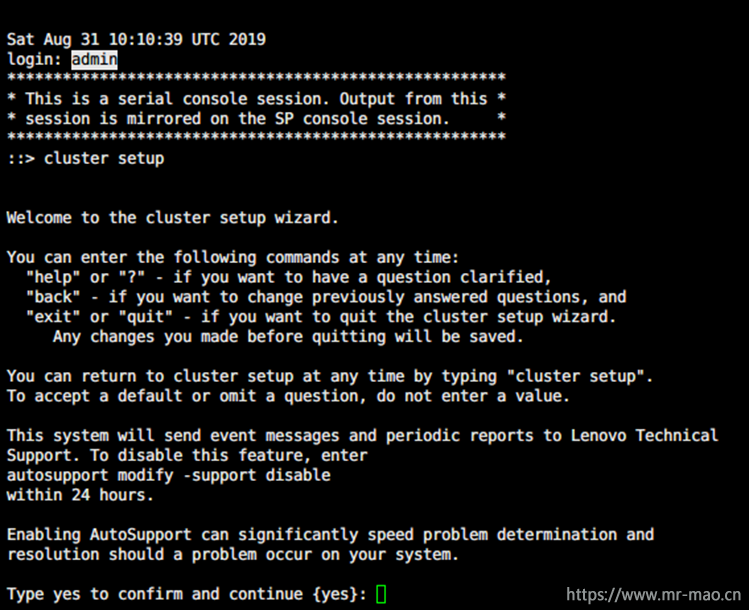
管理端口选默认的e0M,直接回车即可,然后设定节点管理地址。

此时已经可以切换到GUI了,为了叙述方便,后面仍使用CLI操作,回车
Otherwise, press Enter to complete cluster setup using the command line
interface:
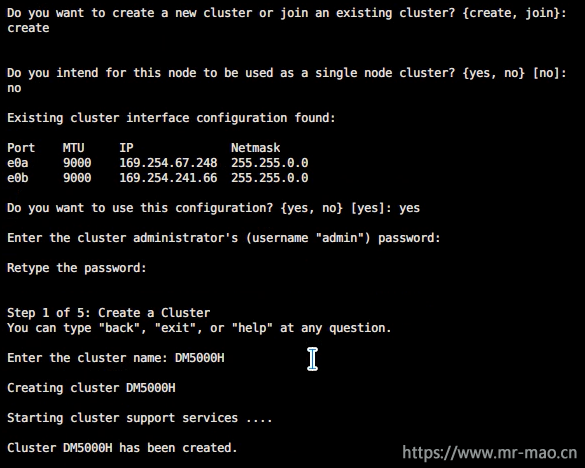
第一个节点选择create创建集群
Do you want to create a new cluster or join an existing cluster? {create, join}:
create
如果不是single node配置,选择no
Do you intend for this node to be used as a single node cluster? {yes, no} [no]:
保留这些默认地址,尤其是在switchless配置下,这些地址只在内部可见,记录这些地址,后面另一节点加入集群时需要
Existing cluster interface configuration found:
Port    MTU     IP              Netmask
e0a     9000    169.254.67.248  255.255.0.0
e0b     9000    169.254.241.66  255.255.0.0

Do you want to use this configuration? {yes, no} [yes]:

设置管理口令
Enter the cluster administrator's (username "admin") password:

Retype the password:
输入集群名字,起一个含义清晰地名字,特别是有集群间复制的情况下,用cluster01之类的容易混淆。
Step 1 of 5: Create a Cluster
You can type "back", "exit", or "help" at any question.

Enter the cluster name: DM5000H

Creating cluster DM5000H

Starting cluster support services .

Cluster DM5000H has been created.
输入license,目前联想配置的设备默认已经提供了license,可跳过,后面也可在图形界面输入。
Step 2 of 5: Add Feature License Keys
You can type "back", "exit", or "help" at any question.

Enter an additional license key []:
设置集群管理SVM,输入集群管理地址,建议设在e0M上,也可以在数据端口上。
Step 3 of 5: Set Up a Vserver for Cluster Administration
You can type "back", "exit", or "help" at any question.

Enter the cluster management interface port: e0M
Enter the cluster management interface IP address: 192.168.70.120
Enter the cluster management interface netmask: 255.255.255.0
Enter the cluster management interface default gateway [192.168.70.1]:


A cluster management interface on port e0M with IP address 192.168.70.120 has been created.  You can use this address to connect to and manage the cluster.

Enter the DNS domain names:
存储的failover将在另一节点加入时打开
Step 4 of 5: Configure Storage Failover (SFO)
You can type "back", "exit", or "help" at any question.


SFO will be enabled when the partner joins the cluster.
设置设备地点
Step 5 of 5: Set Up the Node
You can type "back", "exit", or "help" at any question.

Where is the controller located []: LZU


Cluster "DM5000H" has been created.

To complete cluster setup, you must join each additional node to the cluster
by running "system node show-discovered" and "cluster add-node" from a node in the cluster.

To complete system configuration, you can use either OnCommand System Manager
or the Data ONTAP command-line interface.

To access OnCommand System Manager, point your web browser to the cluster
management IP address (https://192.168.70.120).

To access the command-line interface, connect to the cluster management
IP address (for example, ssh admin@192.168.70.120).
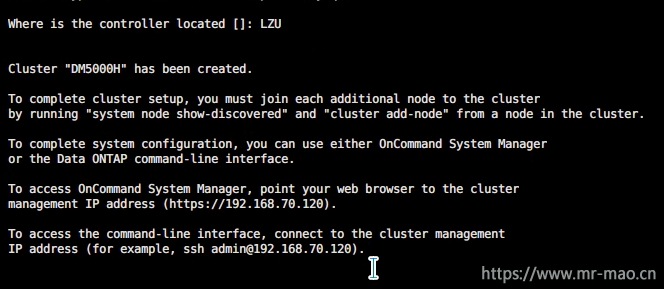
至此创建集群完成
5,将其它节点加入集群
用microUSB 连接另一节点,同样启动配置向导,或输入cluster setup启动
输入第二个节点的管理地址
Enter the node management interface port [e0M]:
Enter the node management interface IP address: 192.168.70.122
Enter the node management interface netmask: 255.255.255.0
Enter the node management interface default gateway: 192.168.70.1
A node management interface on port e0M with IP address 192.168.70.122 has been created.

Use your web browser to complete cluster setup by accessing
https://192.168.70.122
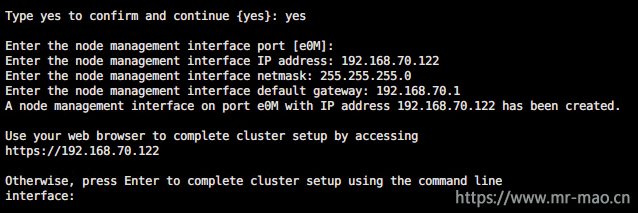
此时已经可以使用GUI,为了叙述和配置方便,继续使用CLI
Otherwise, press Enter to complete cluster setup using the command line
interface:

This node's storage failover partner is already a member of a cluster.
Storage failover partners must be members of the same cluster.
The cluster setup wizard will default to the cluster join dialog.
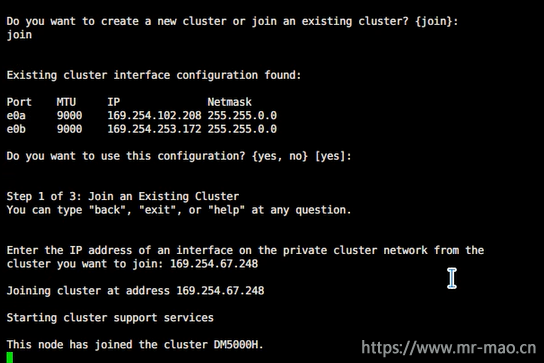
选择加入
Do you want to create a new cluster or join an existing cluster? {join}:
join
接受默认地址,特别是switchless配置下
Existing cluster interface configuration found:

Port    MTU     IP              Netmask
e0a     9000    169.254.102.208 255.255.0.0
e0b     9000    169.254.253.172 255.255.0.0

Do you want to use this configuration? {yes, no} [yes]: yes


Step 1 of 3: Join an Existing Cluster
You can type "back", "exit", or "help" at any question.
输入在上一个节点记录的其中一个IP地址
Enter the IP address of an interface on the private cluster network from the
cluster you want to join: 169.254.67.248

Joining cluster at address 169.254.67.248

Checking cluster applications .......

This node has joined the cluster DM5000H.
存储failover打开

Step 2 of 3: Configure Storage Failover (SFO)
You can type "back", "exit", or "help" at any question.


SFO is enabled.


Step 3 of 3: Set Up the Node
You can type "back", "exit", or "help" at any question.


This node has been joined to cluster "DM5000H".

To complete cluster setup, you must join each additional node to the cluster
by running "system node show-discovered" and "cluster add-node" from a node in the cluster.

To complete system configuration, you can use either OnCommand System Manager
or the Data ONTAP command-line interface.

To access OnCommand System Manager, point your web browser to the cluster
management IP address (https://192.168.70.120).

To access the command-line interface, connect to the cluster management
IP address (for example, ssh admin@192.168.70.120).


Notice: HA is configured in management.
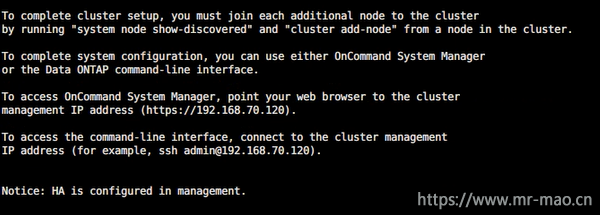
至此,节点加入完成
6,调整磁盘归属(通常仅限DM3000H或DM5000H)
默认的两个控制器各一半硬盘,配置聚合,先选择扩展柜的SATA硬盘
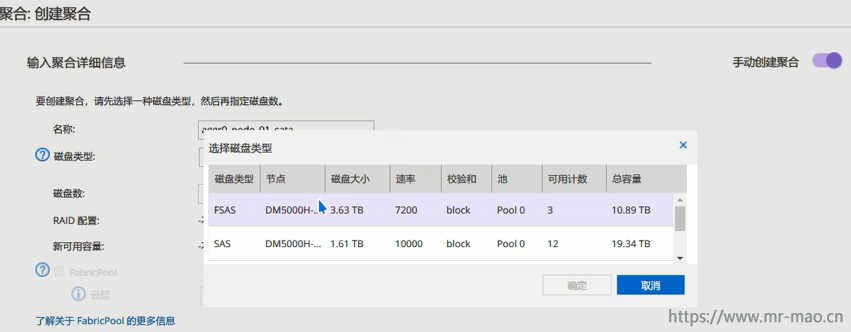
提示无法创建raid
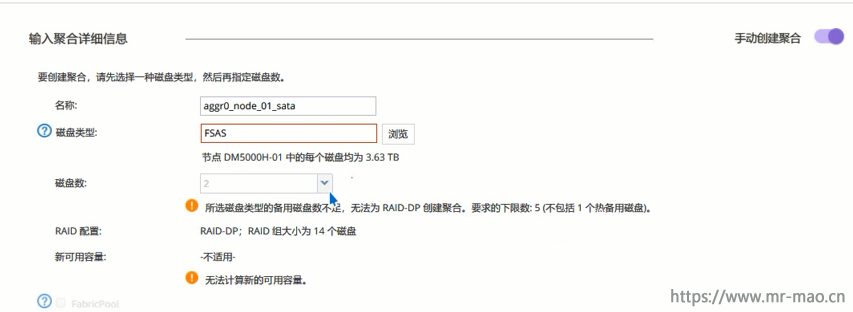
storage disk show -partition-ownership
6个大盘分布在两个控制器
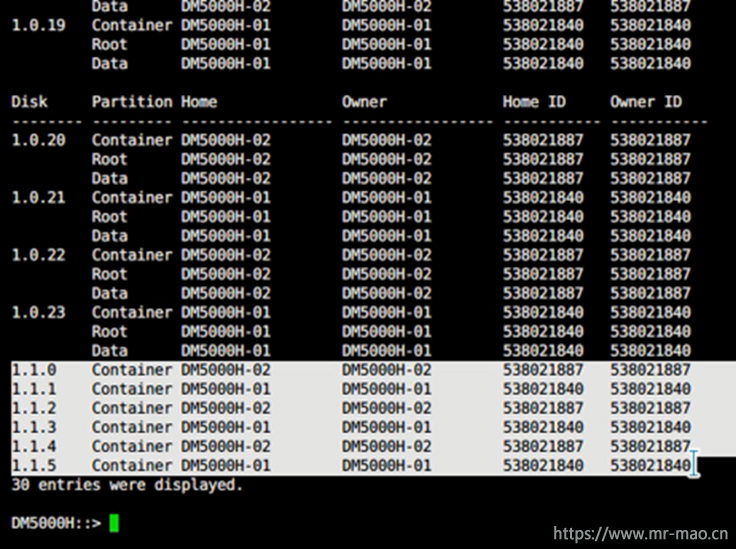
把所有的大盘都归属到node1
先进入advanced 模式,
set advanced
storage disk assign -disk 1.1.0 -owner DM5000H-01
会提示disk1.1.0已经有所属控制器。加-force即可
storage disk assign -disk 1.1.0 -owner DM5000H-01 -force
storage disk assign -disk 1.1.1 -owner DM5000H-01 -force
storage disk assign -disk 1.1.2 -owner DM5000H-01 -force
storage disk assign -disk 1.1.3 -owner DM5000H-01 -force
storage disk assign -disk 1.1.4 -owner DM5000H-01 -force
storage disk assign -disk 1.1.5 -owner DM5000H-01 -force
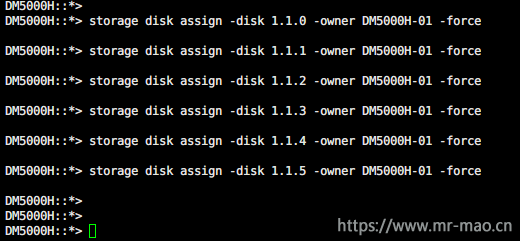
此时所有的大盘都归属到node1
然后返回到admin模式
set admin
storage disk show -partition-ownership
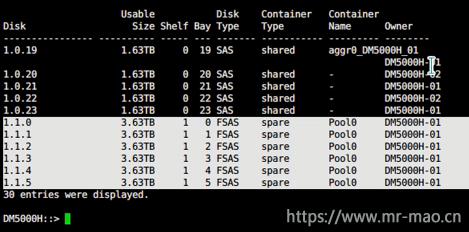

7,创建聚合
返回gui界面,导航到聚合菜单,重新创建聚合,node1拥有6个sata硬盘,此时可以创建raid
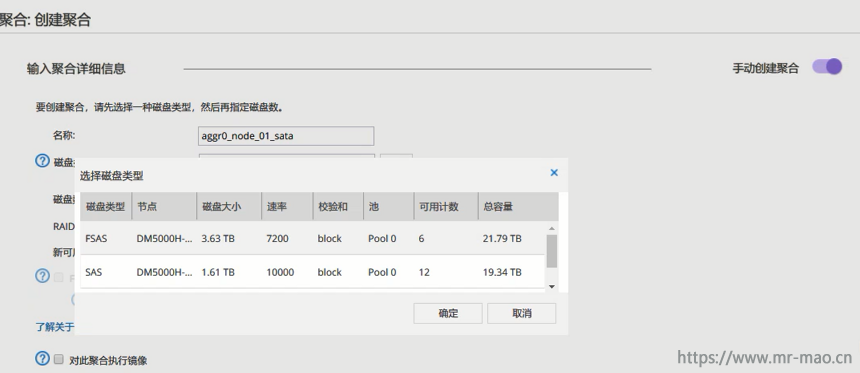
依次创建聚合,我这里有三个,两个控制器各一个,扩展柜一个。
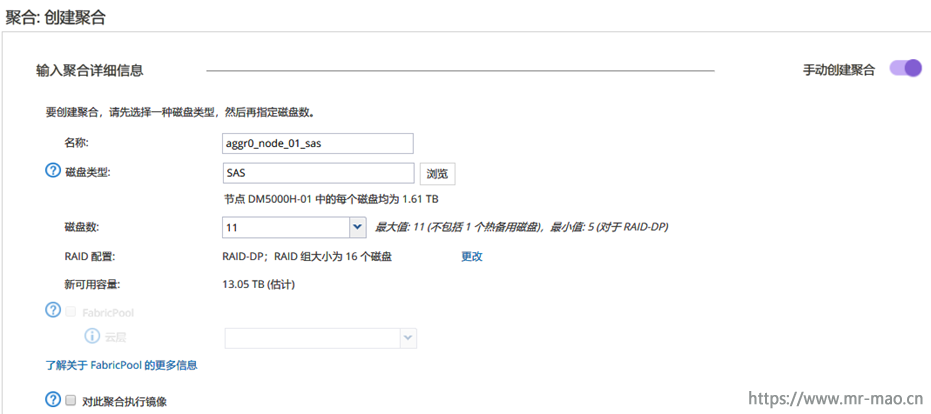

8,更改数据端口协议
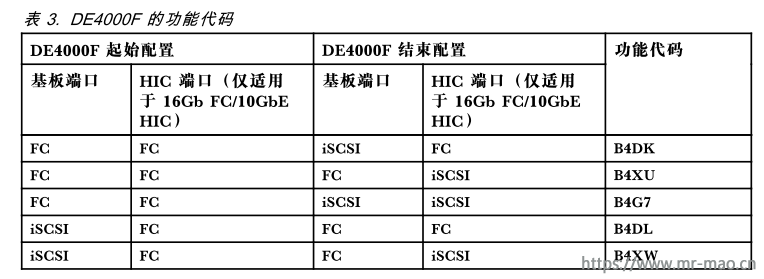
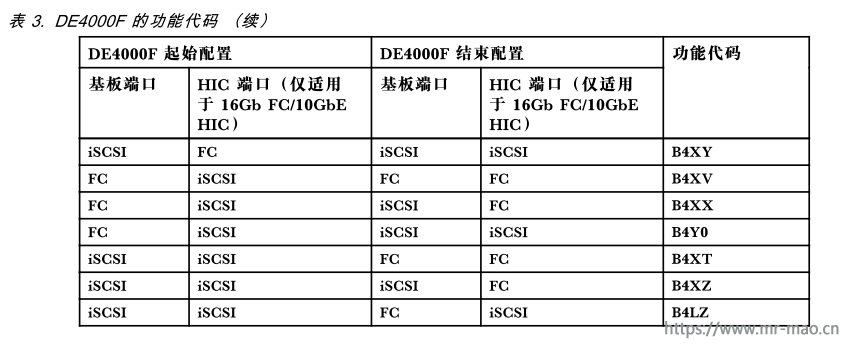
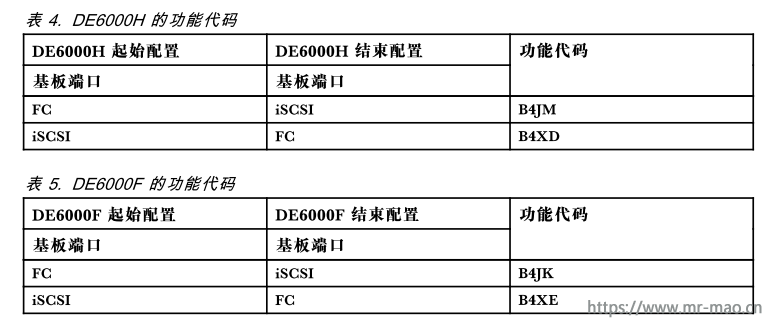
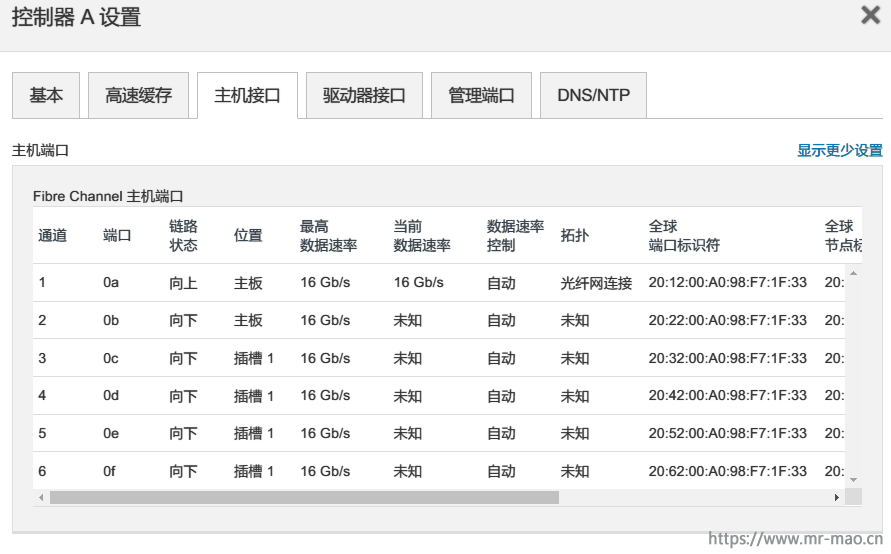
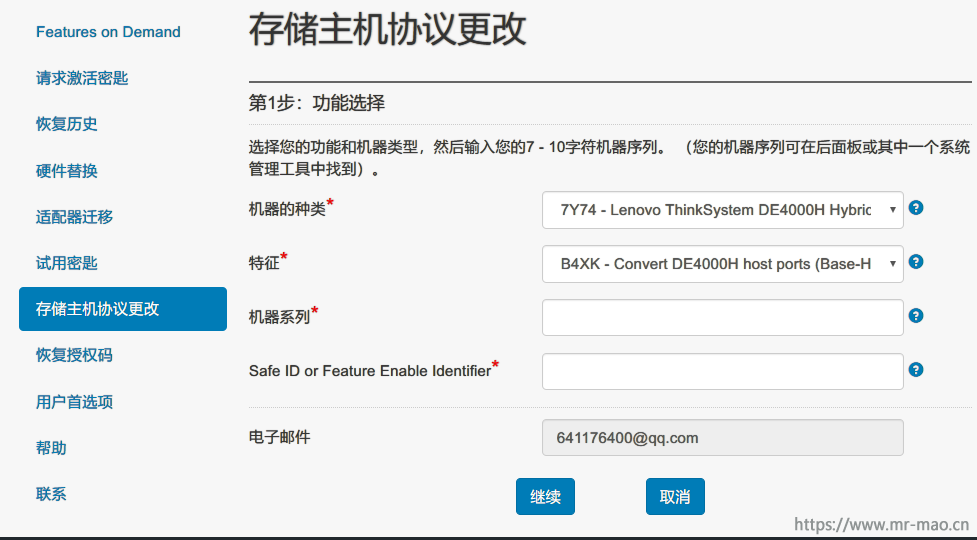
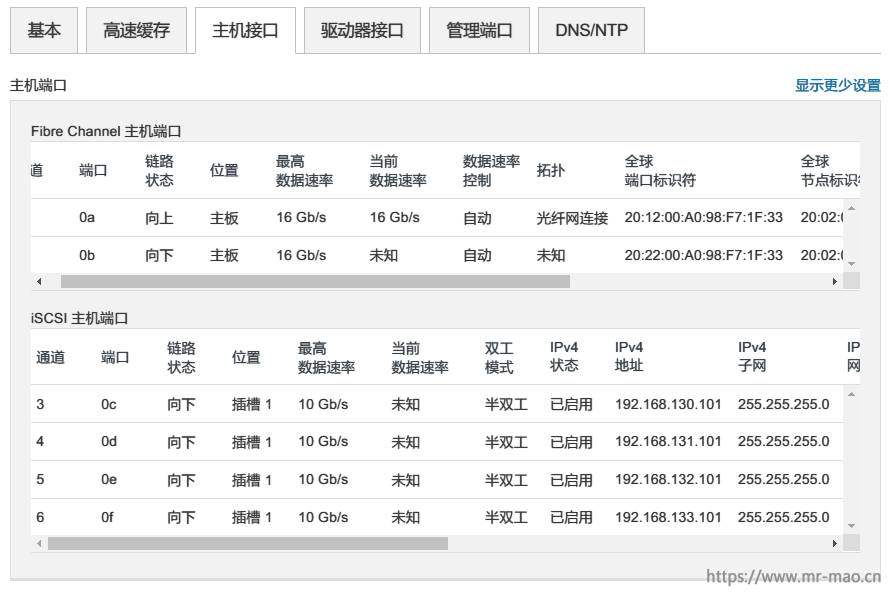
DM出厂默认数据端口为融合网络模式,如果需要iSCSI或者NAS,直接插网络模块即可,如果需要FC,则要转换端口协议
转换协议之前需要将相应的端口禁用,每个控制器的0c和0d是同一芯片,0e和0f是同一芯片,转换0c协议时会提示一起转换0d,同样,转换0e时会同时转换0f,IP模式和fc模式可以共存,但是为了控制器的HA,建议把每个控制器同一芯片下的端口转换为统一的数据协议。这里只转换两个控制器的0c和0d
fcp adapter modify -node DM5000H-01 -adapter 0c -status-admin down
fcp adapter modify -node DM5000H-01 -adapter 0d -status-admin down
fcp adapter modify -node DM5000H-02 -adapter 0c -status-admin down
fcp adapter modify -node DM5000H-02 -adapter 0d -status-admin down
转换数据端口为fc模式
system node hardware unified-connect modify -node DM5000H-01 -adapter 0c -mode fc
system node hardware unified-connect modify -node DM5000H-02 -adapter 0c -mode fc

重启节点,使其更改生效
system node reboot -node DM5000H-01
system node reboot -node DM5000H-02
把禁用的端口启用
fcp adapter modify -node DM5000H-01 -adapter 0c -status-admin up
fcp adapter modify -node DM5000H-01 -adapter 0d -status-admin up
fcp adapter modify -node DM5000H-02 -adapter 0c -status-admin up
fcp adapter modify -node DM5000H-02 -adapter 0d -status-admin up
更改完端口可以查看端口当前模式
system node hardware unified-connect show -node DM5000H-01 0c
system node hardware unified-connect show -node DM5000H-02 0c
如果需要将端口转换为IP模式,则输入下面的命令
system node hardware unified-connect modify -node DM5000H-01 -adapter 0c -mode cna
system node hardware unified-connect modify -node DM5000H-02 -adapter 0c -mode cna
9,创建SVM
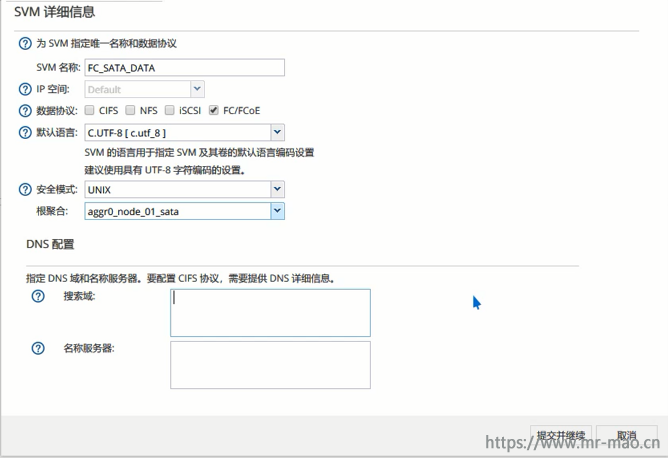
导航到SVM菜单,填写SVM名称,选择数据协议,选择新建SVM所在的根聚合,点击提交并继续
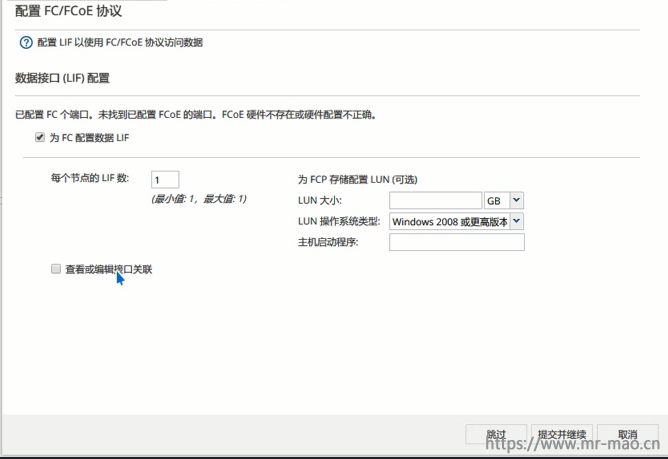
在配置FC/FCoE协议窗口中,勾选 为FC配置数据 LIF,每个节点的LIF数根据情况自定义,我这里每个控制器只用了一个端口,则这里填1,点击提交并继续
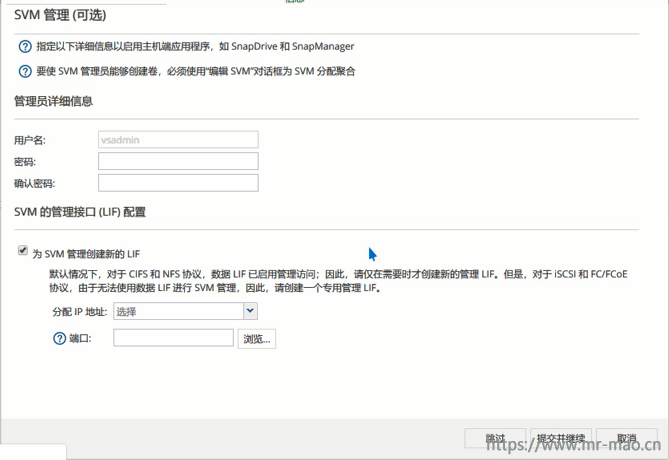
在SVM管理界面,跳过即可
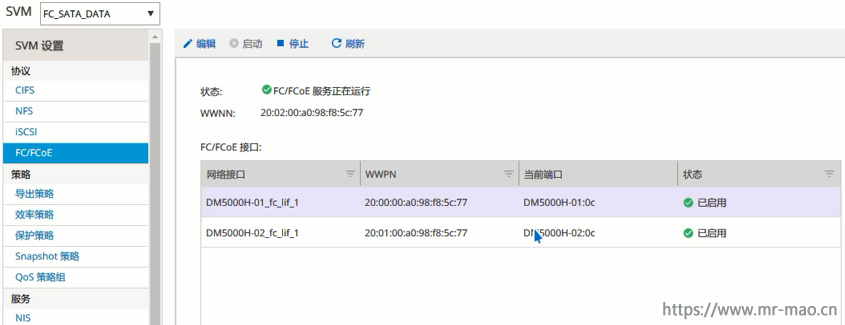
确保SVM的FC协议下的数据LIF端口都是已启用的状态
10,创建卷
导航到卷菜单,在SVM下拉菜单中选择之前创建的SVM,单击创建,输入名称,已经卷大小,点击创建
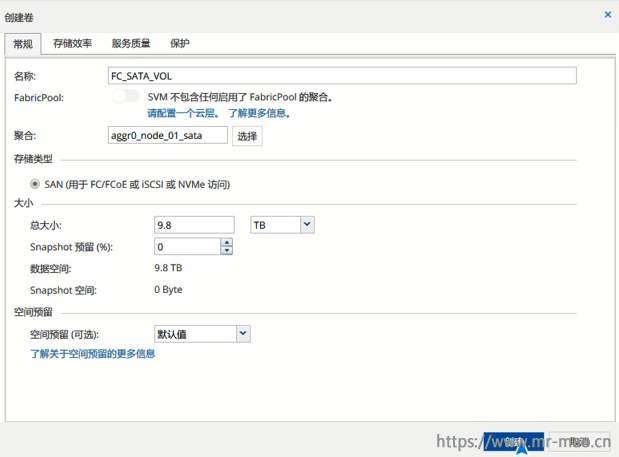
依次创建三个聚合下的卷

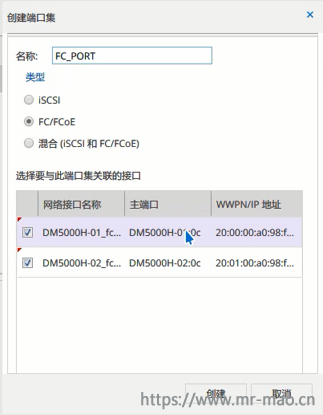
11,创建端口集
导航到LUN菜单下,在SVM下拉菜单中选择之前创建的SVM,单击端口集,点击创建
输入名称,类型选择FC/FCoE,然后勾选相应的数据端口,然后单击创建
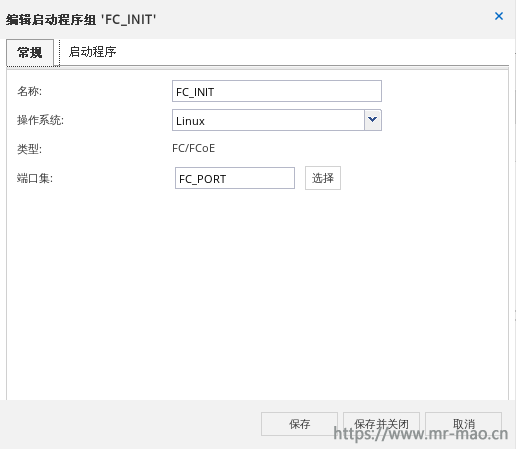
12,创建启动程序组
点击启动程序组,单击创建,输入名称,选择操作系统类型,在端口集中选择上一步创建好的端口集
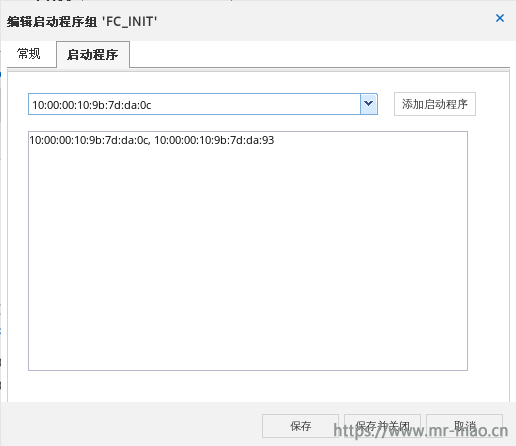
点击启动程序标签,添加主机HBA卡的wwpn
13,创建LUN
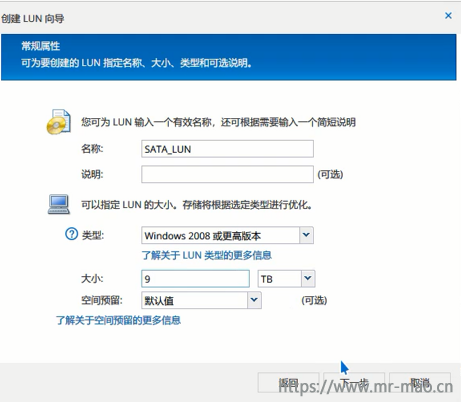
点击LUN管理,单击创建,输入名称,大小,点击下一步
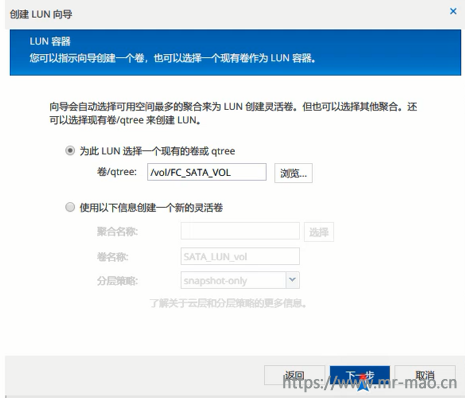
在LUN容器窗口中,点击浏览,为此lun选择第10步创建好的卷,单击下一步
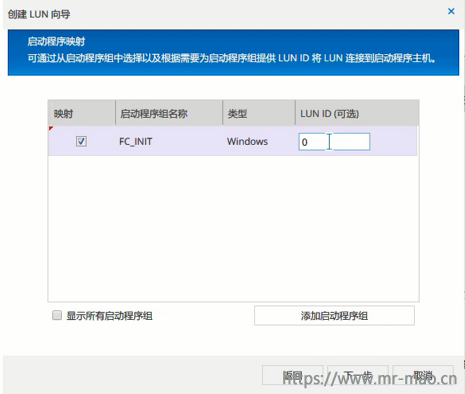
勾选映射,点击下一步
依次创建已有卷的LUN
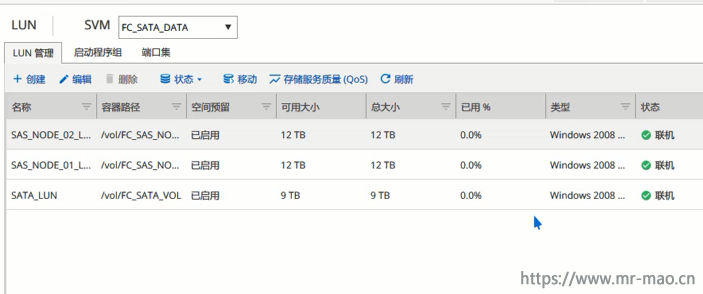
14,然后在主机端扫描磁盘

15,配置服务管理地址
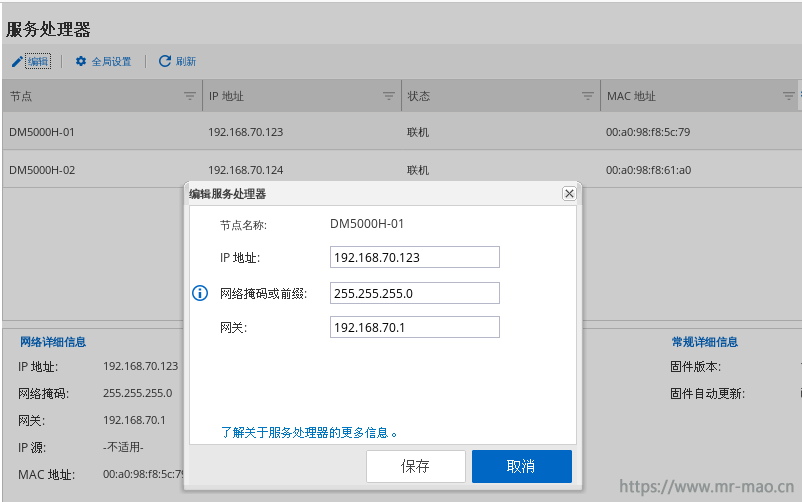
system service-processor network modify -node DM5000H-01 -address-family IPv4 -enable true -ip-address 192.168.70.123 -netmask 255.255.255.0 -gateway 192.168.70.1
system service-processor network modify -node DM5000H-02 -address-family IPv4 -enable true -ip-address 192.168.70.124 -netmask 255.255.255.0 -gateway 192.168.70.1
这个功能类似于服务器的硬件后台管理BMC,但是只有cli console,如果不配置,会有以下报错提示
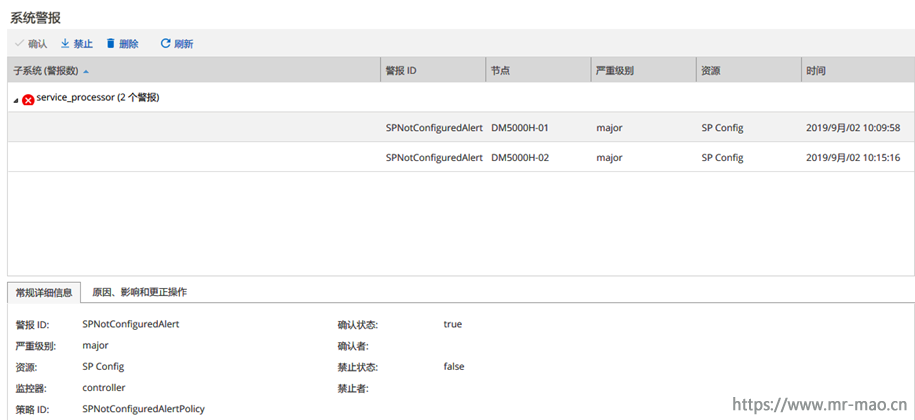
也可以直接在浏览器GUI界面中配置地址
三,删除集群恢复出厂设置及重新导入许可
此操作为可选项,在没有数据或者确定可以删除集群的情况下进行。
通过串口线登录任意一个节点,ctrl+G切换到BMC,输入
system power off
然后
system power on
exit
此时节点ontap会重新启动,出现Ctrl—C信息提示时,按ctrl+c 进入启动菜单
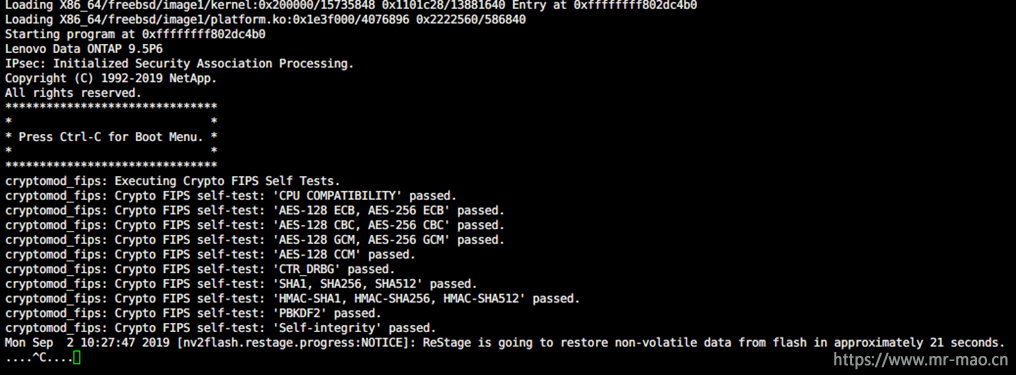
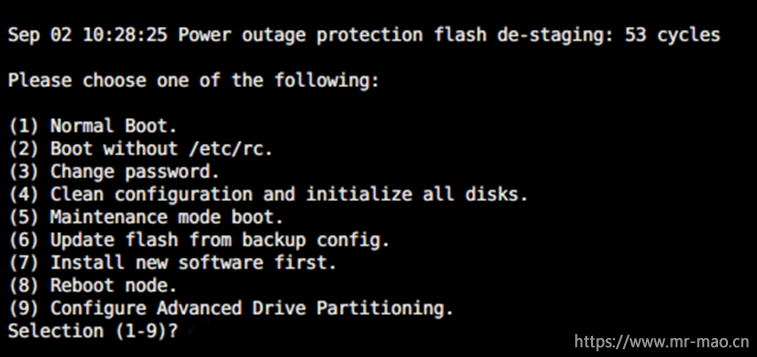
输入数字5,进入维护模式,此操作只需要在一个节点执行即可,
输入下面的命令
storage release disks
输入yes

然后输入halt,随后输入boot_ontap,在ontap启动过程中继续按ctrl+c进入启动菜单,选择4
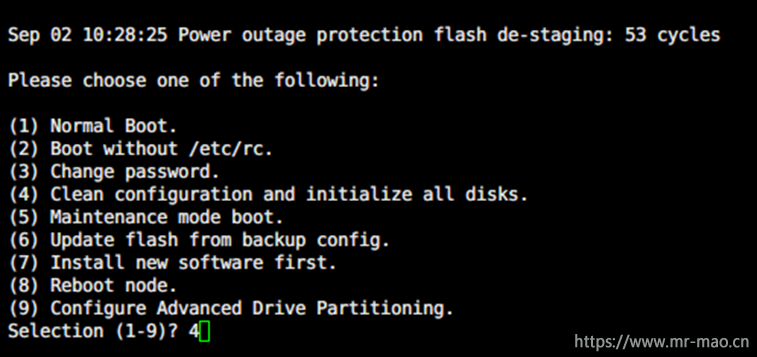
清除配置及零化硬盘,输入两次yes
用串口线登录另一个节点,ctrl+g切换到BMC下,输入system power off,然后输入system power on,然后输入exit,出现ctrl+c提示时,按ctrl+c进入启动菜单,直接输入4,然后回车,输入两次yes清除配置。
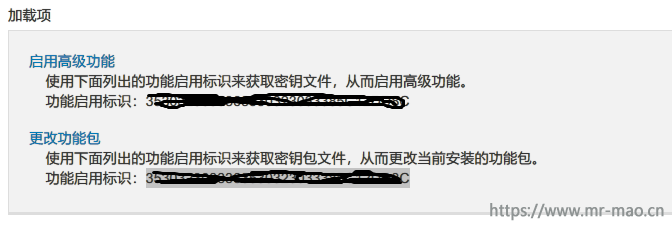
DM出厂默认自带四种授权许可(NFS/CIFS/ISCSI/FCP),如果恢复出厂设置,则连许可都删除,新建集群以后,无任何许可,无法使用任何功能,

此时需要恢复许可,登录联想的fod网站,登录账号
https://fod.lenovo.com/lkms/angular/app/pages/index.htm#/welcome
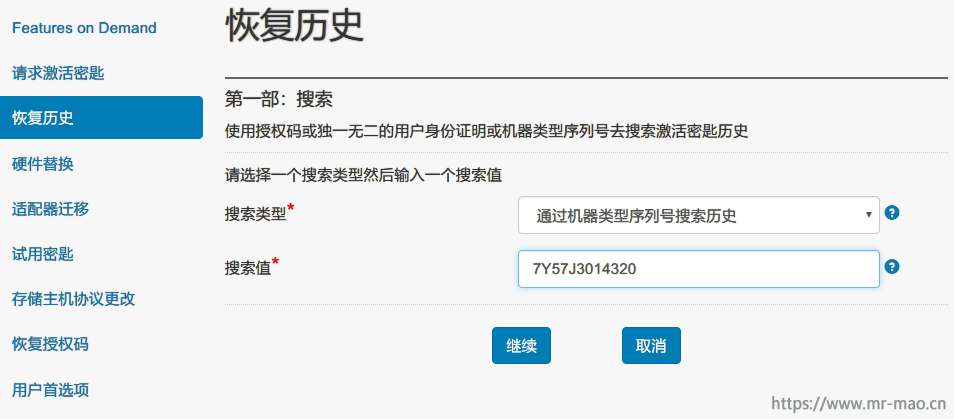
点击恢复历史,在搜索类型*中选择通过机器类型序列号搜索历史,在搜索值*中填写机器的MT和SN组合,点击继续
在结果栏中显示机器自带的8个许可文件,每个控制器4个,选择前两个授权文件,
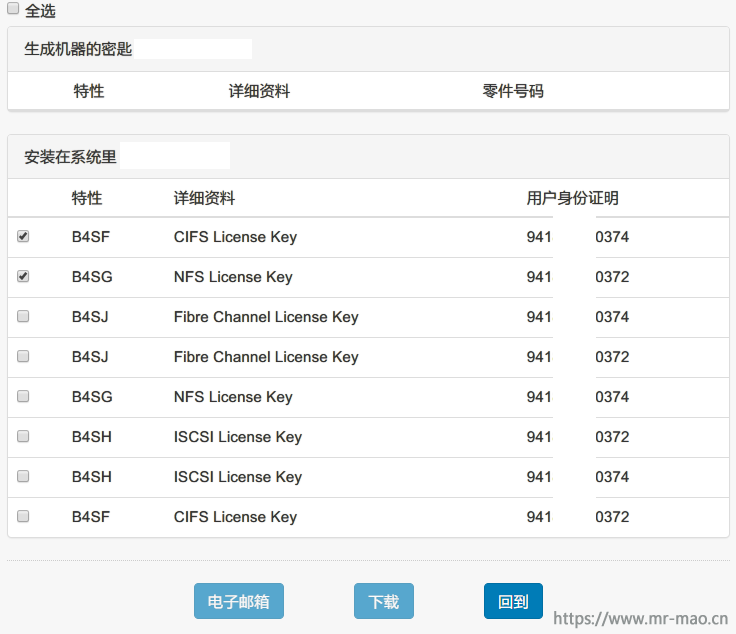
点击电子邮箱,邮箱会收到授权许可
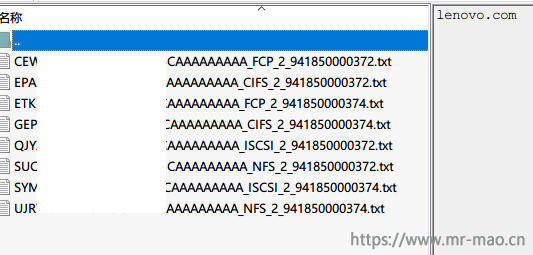
在浏览器GUI中依次添加8个许可,或者在CLI 中使用命令license add 依次添加许可
四,测试HA
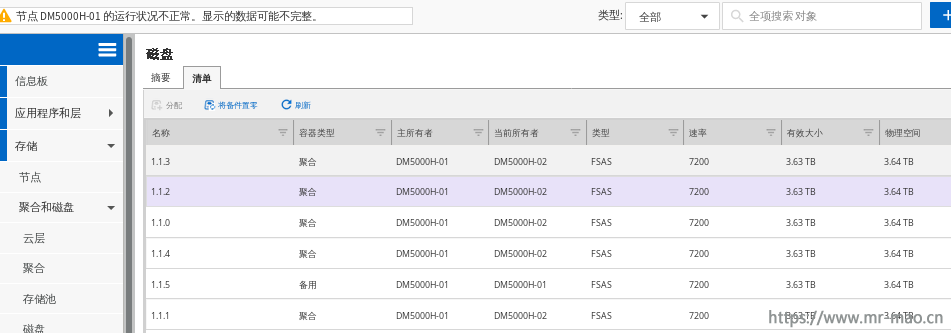
在第6步的时候,我把扩展柜的6块硬盘全部归属到了node1,把node1关机,看看什么情况
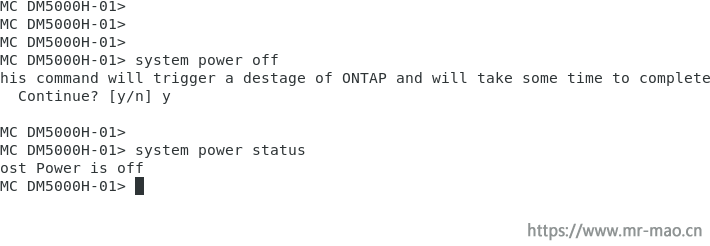
所有的大盘自动归属到node2
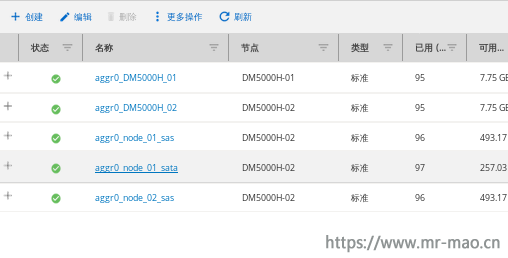
SATA硬盘的聚合也迁移到node2
开启node1节点
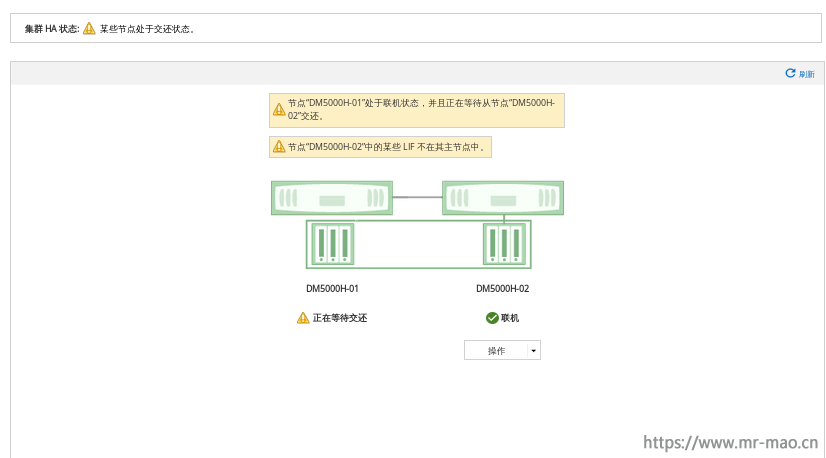
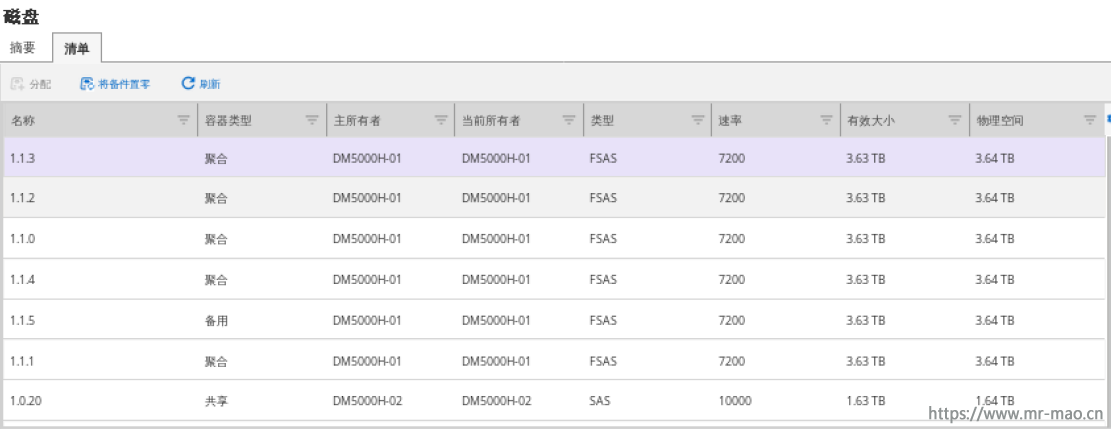
待HA归还完毕,所有硬盘自动归还,归属到主所有者node1
五,附常用初级命令:
查看集群状态: cluster show
查看集群HA状态:cluster ha show
查看节点状态: node show
查看系统状态:health status show
查看系统版本:version
查看镜像:system node image show
查看序列号: node show -fields serialnumber
查看许可:license show
设置时区:timezone Asia/Shanghai
设置时间:date
设置NTP服务器: cluster time-service ntp server create -server 192.168.70.1
查看NTP服务器: cluster time-service ntp server show
设置DNS:  dns create -vserver <vserver> -domains <domain> -name-servers <DNS IP>
查看DNS: dns show
查看集群网络配置:network interface show
查看集群网络端口状态: network port show
查看网络路由:network route show
查看SVM: vserver show
查看聚合: aggr show
查看卷:volume show
